
I recently made this My Little Pony “Pinkie Pie” cake for a very sweet little girl’s sixth birthday. I made a large round chocolate cake using this “Never-Fail”s recipe from Smitten Kitchen (thanks once again to Maud who pointed me in the direction of this frankly brilliant website, I just went on to get the link, and half an hour later have bookmarked about 30 recipes that I know will be just sublime) (Tomorrow, I am trying “Best Chocolate Pudding“. Or maybe tonight. Seriously, how could I stop myself?)
Anyway, apologies for that little foray into Smitten-Kitchen-land… back to Pinkie Pie. Grace and I spent a lot of time the week of the party discussing the decoration for this cake. I wanted something effective, and relatively simple; Grace wanted a life-sized Pinkie-Pie which had layers of rainbow sponge when you cut into it.
Needless to say, I won. I love decorating cakes…. when I don’t have six children present, three of which are hellbent on dementing “helping” me (which means I’ll start decorating cakes at a rather fabulous level in about 17 years time) But until then, I relish the challenge of making relatively-simple but child-pleasing cakes like this one here. It really is a matter of rolling out icing and cutting it into shapes (with a little swirl of a paintbrush here and there)
So, To The Cake Tutorial! This method can be used for almost any picture (simple shapes are best)
Firstly, I printed out a (Grace-approved) picture of Pinkie Pie, large enough to fit on the top of the cake.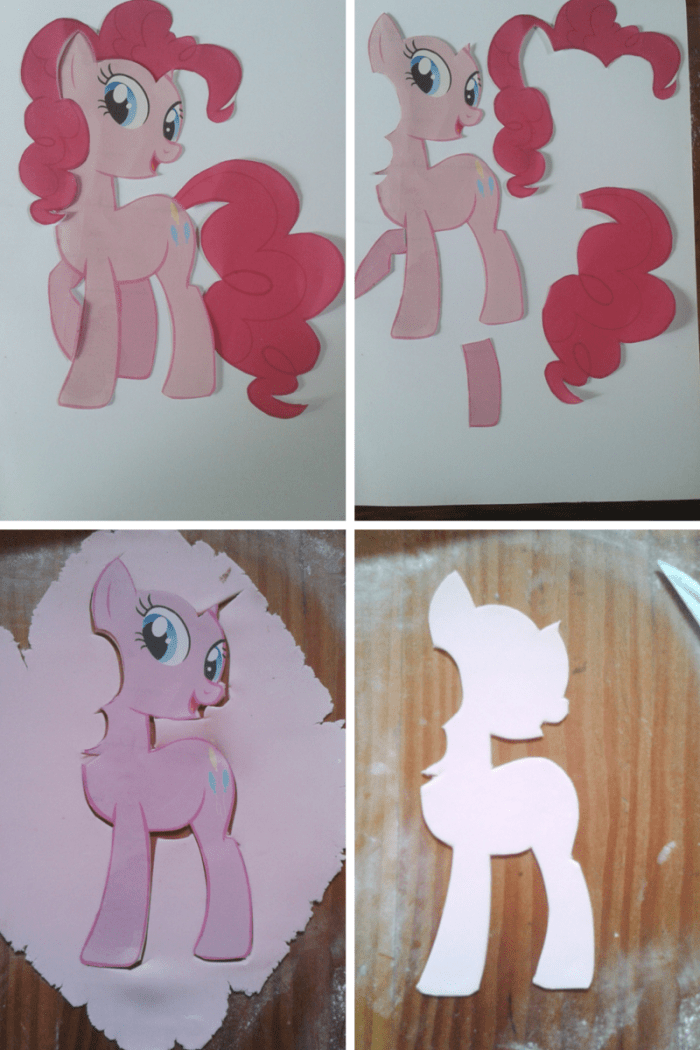
I cut out all the component parts of the picture, then rolled out corresponding coloured fondant icing.
I lay the paper on the correct colour icing and cut around it, until I had the shapes I had cut from paper, in fondant.
I decided on a blue background, so rolled this fondant out, used the base of the time as a guide for the size, and cut it out.
The cake had been iced in chocolate ganache so I carefully centered and lay the blue icing on top. Then, I started with the main body of Pinkie Pie. For the eyes, I cut out the shapes in white, added a blue iris and then with a little black icing colour, painted the iris. With a tiny dot of white fondant, flattened, I added the “sparkle”! 
With a fine brush, I painted the eyelashes too. I then attached the rest of the parts, jigsaw-like, to make up Pinkie Pie: mane, tail, little balloons on her bottom!
With a little deep red icing paste mixed with water, and using the fine brush, I paint flourishes on her tail and mane, then a little mouth like in the picture. 
Grace had made flowers and leaves and we decorated the cake with them, then a little sprinkle of icing sugar, and ta-dah! A gorgeous, easy to make Pinkie Pie cake!
Wowzers Emily. That’s some cake! My pony fans would love it. Not sure I’ve either the patience or the steady hand mind
Oh Helen, it really is very easy, and very impressive-looking. And quick! Get the smallest to make the flowers in the background while you do the pony. They will eat most of the fondant flowers, but you will be mostly left alone to *create* 🙂
Oh wowzers!! Looks fab 🙂 Great team work 🙂 xx
That’s AMAZING! (I suspect your definition of “easy” and mine are not quite the same.) Do you make your own fondant icing? I’ve never done fondant so it scares me a little.
That’s stunning and something I’d really like to try.
No, Christine, I just buy it readymade. Seriously!! Very easy 😀
I’m a great one for telling people “oh it is so easy. You just….” but this, Emily, is amazing. I’d say it is a case of easy if you know how.
Wow!
Amazing cake Emily 🙂
Emily I’m mentioning you and your fabulous cake in a post about the birthday cake I made this weekend for my son’s birthday. I hope that’s ok with you.
Fionnuala
Absolutely, thank you! I read your Outdoor Kitchen post, completely inspired. When I’m on a real computer I’ll comment properly; of *course* I have a candle basket: who doesn’t?!