(Edited: 24 January 2014- I have made another tutorial for a similar doll, WITH FREE PDF PATTERN for download. You can find it here: http://blog.thenest.ie/2014/01/24/turorial-8-waldorf-snuggle-doll-pdf-pattern/ )
Years ago, I bought little soft Waldorf dolls for our boys… and how they loved them-Liam, our youngest boy had Green Baby until one day, the dog, in a fit of pique ran off with it and buried it, to be found 2 years later, disintegrated, in the yard. (That dog subsequently ran off permanently, in another fit of pique)
I made another Green Baby, and in time, the children added to their Baby-stashes with Yellow Baby, Red- , Purple-, Blue and Pink-Baby. These little dolls all have different “powers” (you really do have to be a young boy to get the powers thing) and are brought everywhere- on holidays, to friends houses and in the car.
They are floppy little dolls, filled with wool and beads, and can be posed in lots of different ways. We have many days where beds, clothes and accessories are made for these little ones, and they are an integral part of most of their games.
Last night when I went to look in on our little ones, thinking they should be asleep hours by now, I found a little small face peering up at me, a long way from sleep, his mind overactive in the dark. He began telling me about the beds he had made for his Green and Yellow Babies and how he would love a white “Snow” baby, and all the powers that baby would have.
So, when a friend of mine had to cancel a visit today due to the weather, I decided to make Snow Baby for our little chap. (I had said that I would make one for Christmas, but as Liam said “a day in the life of a child is a very long time” !!) As soon as I started several more “orders” came in (for and Orange and a “Pinky” Baby) and so I set to work. I have documented the Snow Baby here in tutorial, it took me about an hour in all to make (and I am not the most proficient sew-er), they are so easy and simple to make- and eminently adjustable-: the head could be a simpler one, or the stuffing could be whatever you have, including fabric rags. I make things in a very organic way, using whatever I have on hand, so I would encourage you to do the same.
(I have included notes on making in italics throughout)
This tutorial is picture-heavy- in some cases I won’t write the descriptions if the picture explains it better than my long-winded explanations (I, like my friend Sophie, and well described by her husband: am “a fan of the long sentence”!)
Materials:
Wool fibre (used for felting, also known as “batting”)
Tubular stockinette approx 4″ (for encasing the wool head before the doll-skin fabric)
doll tone knit approx 5″ x 6″ (you could also use white t-shirt fabric dyed a skintone colour with tea)
Jersey, velour, fleece fabric (something with a little stretch) for body (I used an old white baby-gro that has been stained around the neck, an old orange fleece top for Orange Baby, and a polka dot fleece babygro for “Pinky” baby)
Sissors, needle and thread
How to:
Before we start, let me explain the proportions of most traditional Waldorf dolls: the head is one quarter, i.e. 25% of the size of the entire body. This doll is 8 inches long, I am basing the dimensions on Purple Baby here. So hence, the head is a 2″ ball (explained further in a bit)
So. We have to draw a pattern for our baby- (email me if you would like me to send you a PDF pattern, but it is easy to draw out)
I roughly drew out the shape, and when I was happy with it, folded over an A4 sheet, drew it on the fold so that when I cut it out, both sides would be the same:
Once you have your proportions correct, you start with the head. (I am going to post a second pictorial tutorial after this one for the head in detail) But, firstly, sew a running stitch through the top of the stockinette: (the stockinette should be approx 4″ for this head)
The gist of head making: You tightly wind the wool into a ball (I have to admit to cheating, and took out my felting needles and used them to create a tight wound ball) You are aiming for 2″ all around.Leave some wool coming down to form the neck, and this is important for attaching the head to the body later on.
When you are happy it is as tight as you can wind it, pull the stockinette down over it
(Ideally, the stockinette should be longer, but this was a piece I had)
Tie a piece of thread tightly around the base of the head (double or treble the thread to make it stronger)
Wrap a strong piece of thread half way down the head too, pulling tight to indent into the head:
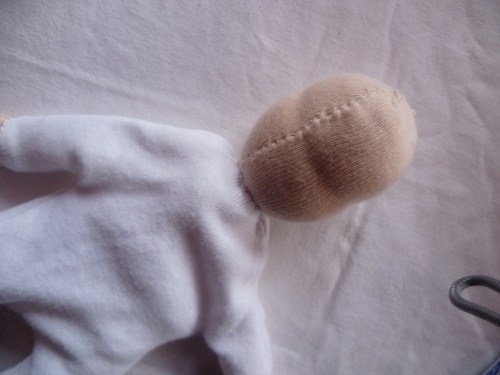
Wrap the head in the skin tone knit, pinning it to hold it in place, then sew neatly up the back, and on the top, folding in the fabric as you go:
Lay your pattern on the reverse of your fabric, and draw around it:
Carefully sew ao the pattern lines, leaving the hand and neck open.
Sew 2 “U” shapedhands from skin tone knit, and cut out:
Stuff the hands quite tightly with wool, and then fit them into the arm holes:
Sew neatly and securely around the wrist to attach the hand:
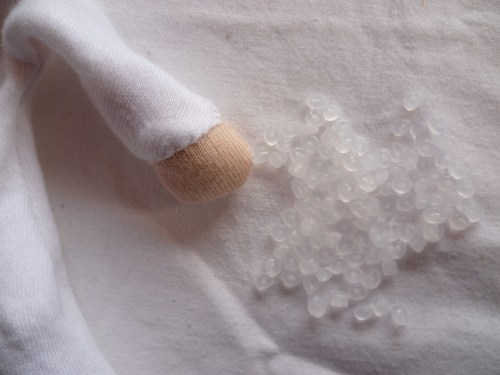
I stuff the feet with wool, and then you decide on your body stuffing:
I chose these little plastic pellets to fill this baby:
A word of warning though: If this is for a small child, make a second cotton body for fitting inside, fill with the pellets and securely sew it shut just in case the outer rips or gets chewed open! (Some doll patterns would say to fill with millet or something like that, but for us, I think in our damp Irish climate it would be growing within a week!)
Once the baby is filled; enough to be floppy but enough to feel relatively full (I reckon approximately 50% filled), fit the head into the neck sace and sew around the neck:
from the front:
From the back:
To make the hat, I wrapped the towelling fabric (I used a towelling fabric washcloth) around the head, securing it with a pin:
This could be handsewn, but I whizzed it up on the machine:
Sew it securely on:
Paint on the sweet little face, adding two rosy cheeks with a dab of blusher.
In the Waldorf tradition this is kept very simple with not much expression in order to allow the child to imaginately decide on the emotion:
And here is Snow baby – in the snow!!


Pingback: Tweets that mention Advent, day 18: Easy Waldorf Doll Tutorial – the Nest -- Topsy.com
Where’s her nose???? 🙁
Didn’t think of a nose!!!!!!!!! I’ll go up with a biro right now!!!
That is the cutest thing i have ever seen!! You are such an inspiration – i am going to have to start a ring binder to hold all the print outs from you that i will never actually get to make. x
Pingback: Red Baby Doll Neck
[…] Advent, day 18: Easy Waldorf Doll Tutorial – the Nest I made another Green Baby and in time, the children added to their Baby-stashes with Yellow Baby Red- , Purple-, Blue and Pink-Baby These little dolls all have different “powers” (you really do have to be a young boy to get the powers . Jersey, velour, fleece fabric (something with a little stretch) for body (I used an old white baby-gro that has been stained around the neck an old orange fleece top for Orange Baby and a polka dot fleece babygro for “Pinky” baby) . […]
That is the cutest little doll! I LOVE how simple it is. My girls would go nuts over a rainbow of babies like this. 🙂
Pingback: Easy Handmade Floppy Waldorf Doll « The Philosophy of Three
Sooo adorable. I will be making one for my daughter’s 1st birthday coming up. Thank you for a great tutorial.
thanks Nicole! X
I can’t get the revised version and the pdf pattern to open up. Could you email it all to me please? I can’t wait to make my little girl one 🙂
I can’t get the pdf of the revised version to open. Can you please email it to me? Thanks!! You make such beautiful things!
Elise, I certainly will 🙂
Pingback: Being Our Usual Exciting Selves -The Nest
Pingback: Teeny 4" Swaddled Baby Tutorial
I realize that you did this pattern years ago, but I’m hoping you can answer a question for me. I found your darling dolls and want to make one for my 8 mo. old granddaughter. I was wondering if the difference in the Waldorf and the snuggly dolls is the beads. Is one more appropriate for a girl about 8 months. Again, they are darling!! Thanks, Linda
Thanks so much Linda! They are really pretty much the same, yes, except for the beads. For an 8 m.o., I’d probably not use beads unless the seams are really secure. Best of luck with it 🙂
Pingback: So, You’ve Decided to Become a Waldorf Family… | Happy Hedgehog Post
Could you possibly email the pattern to me ? These dolls/figures look great. Have never seen them before. Thanks, Trish.